OIM 11GR2 PS2 Installation steps - High Level
1) Oracle Database Installation
2) RCU 11.1.2.2.0 Installation
3) WebLogic 10.3.6 Installation
4) SOA 11.1.1.7.0 Installation
5) SOA Mandatory Patches for OIM 11g R2 PS2 (Patches comes with OIM installer Disk1)
6) IAM 11.1.2.2.0 Installation
7) Creating domain for IAM
8) Upgrading OPSS Schema using Patch Set Assistant
9) Creating Database Security Store
10) Configure OIM server
11) Configure design console
Binaries:
https://docs.oracle.com/cd/E23104_01/download_readme_idmr2/download_readme_idmr2.htm#BABJEDGH
Oracle Database 11g R2 installers can be downloaded from:
http://www.oracle.com/technetwork/database/enterprise-edition/downloads/index.html
weblogic 10.3.6 installers can be downloaded from :
http://www.oracle.com/technetwork/middleware/weblogic/downloads/wls-main-097127.html
SOA 11.1.1.7.0 installers can be downloaded from:
http://www.oracle.com/technetwork/middleware/bpm/downloads/index.html?ssSourceSiteId=opn
Identity and Access Management 11g R2 PS2 installers can be downloaded from:
http://www.oracle.com/technetwork/middleware/id-mgmt/downloads/oid-11gr2-2104316.html
Identity and Access Management 11g R2 PS2 documents can be access from:
http://docs.oracle.com/cd/E40329_01/index.htm
Identity and Access Management 11g R2 PS2 Matrix can be downloaded from :
OLD Matrix
http://www.oracle.com/technetwork/middleware/id-mgmt/documentation/identity-access-111220certmatrix-2105036.xlsx
New Matrix
https://support.oracle.com/epmos/main/kmservlet?documentUrl=http%3A%2F%2Fwww.oracle.com%2Ftechnetwork%2Fmiddleware%2Fid-mgmt%2Fidentity-accessmgmt-11gr2certmatrix-1714221.xls&operation=docRedirection&docTitle=identity-accessmgmt-11gr2certmatrix-1714221.xls&type=WEB&displayIndex=
Database Tables
https://support.oracle.com/epmos/faces/DocumentDisplay?_afrLoop=483225867340430&id=1541870.1&displayIndex=1&_afrWindowMode=0&_adf.ctrl-state=1dl7zqfvvw_85#REF_TEXT
1) Oracle Database Installation
- Start the installation from the “database” directory by running the runInstaller command as shown below
- Select "Create and configure a database" and click on next
- Select Server Class and click on next
- Select "Single instance database installation" and click on next
- Select Advanced install and click on next
- Select Enterprise Edition and click on next
- Select General Purpose / Transaction Processing and click on next
- Give the Global database ,SID name and click on next
- Click on Character set tab
- Select Unicode and click on next
- Select "Use the same password for all accounts" and click on next
- Run the below commands from root user
2) RCU 11.1.2.2.0 Installation
- Set the below parameters before you start the RCU schema creation
- SQL> alter system set processes=500 SCOPE=SPFILE;
- alter system set open_cursors=800 SCOPE=BOTH;
- Go to rcu/bin and run the ./rcu
- Select Create and click on next
- Give the Database connect details and click on next
- Give the Prefix name and select the Oracle Identity Manager ( In this installation I am installing all the components ) and click on next
- Select "Use same password for all schemas" , enter a password and click on next
3) WebLogic 10.3.6 Installation
- Go to weblogic installer and run "java -jar wls1036_generic.jar"
- Select the checkbox and click on next
- Uncheck the checkbox and click on Done
4)
SOA 11.1.1.7.0 Installation
- Go to SOA installer and run "./runInstaller -jreLoc /app/java6u31/jre"
- Select "Skip software updates" and click on next
5) SOA Mandatory Patches for OIM 11g R2 PS2
- Set the ORACLE_HOME and PATH
- Run the opatch napply command
6) IAM 11.1.2.2.0 Installation
- Go to OIM installer and run "./runInstaller -jreLoc /app/java6u31/jre"
- Select Skip software updates and click on next
7) Creating domain for IAM
- Go to /app/oracle/wlserver_10.3/common/bin and run ./config.sh
- Select "Create a new Weblogic domain" and click on next
- Select the Oracle Identity Mananger ( I have selected all the product) and click on next
- Enter the weblogic password and click on next
- Enter the Database service name,hostname,port,schema passoword and click on next
- Select Administrator server and Managed server,cluster and machines
8) Upgrading OPSS Schema using Patch Set Assistant
- Go to /app/oracle/oracle_common/bin and run ./psa
- Select Oracle Platform Security Services and click on next
- Select both the check boxes and click on next
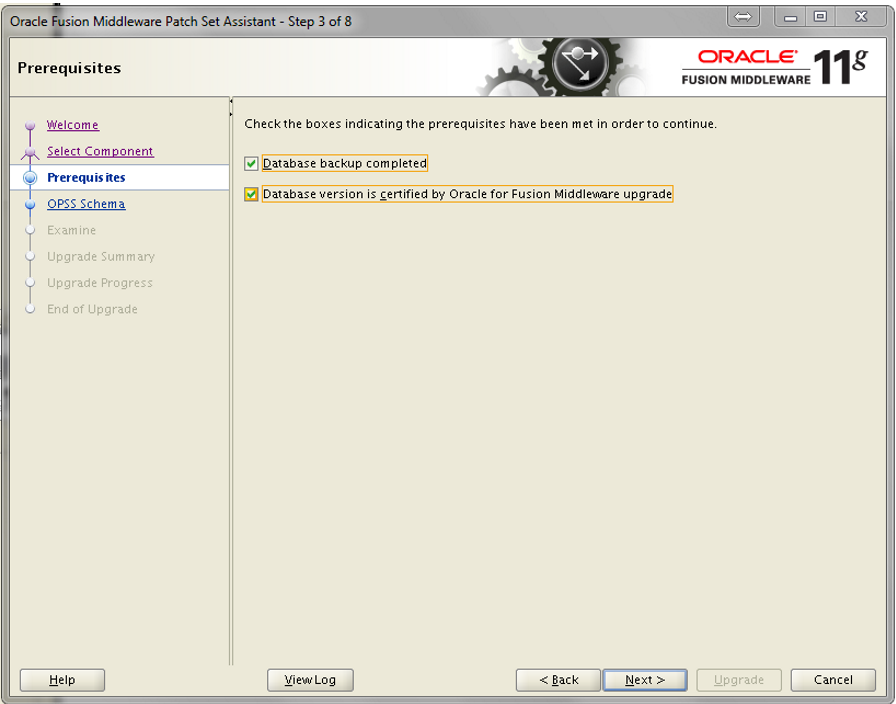
- Enter the database connection details and click on next
9) Creating Database Security Store
- /app/oracle/oracle_common\common\bin
- ./wlst.sh /app/oracle/Oracle_IDM1/common/tools/configureSecurityStore.py -d /app/oracle/user_projects/domains/base_domain -c IAM -p Passw0rd1 -m create
- To validate the security store run the below command
- ./wlst.sh /app/oracle/Oracle_IDM1/common/tools/configureSecurityStore.py -d /app/oracle/user_projects/domains/base_domain -m validate
10) Configure OIM server
- Before starting OIM server configuration start the Admin and SOA server
- Go to /app/oracle/Oracle_IDM1/bin and run ./config.sh
- Select "OIM Server, OIM Design Console" and click on next
- Enter the Database details and click on next
- Enter the weblogic URL,username, password and click on next
- Enter the OIM Administrator Password , OIM URL and click on next
- Enter OIM server hostname,port and click on next
11) Configure design console
- Go to /app/oracle/wlserver_10.3/server/lib and run "java -jar wljarbuilder.jar"
- Copy wlfullclient.jar to /app/oracle/Oracle_IDM1/designconsole/ext and lib
- Go to /app/oracle/Oracle_IDM1/designconsole/ and run ./xlclient.sh
- Weblogic,OIM and SOA URL's
- http://arihant.tdc.com:7001/console
- http://arihant.tdc.com:7001/em
- http://arihant.tdc.com:14000/identity
- http://arihant.tdc.com:14000/syadmin
- http://arihant.tdc.com:8001/soa-infra
- http://arihant.tdc.com:8001/integration/worklistapp
- http://arihant.tdc.com:8001/soa/composer
- http://arihant.tdc.com:14000//SchedulerService-web/Login.jsp
- Starting and stopping the servers
- Weblogic Admin server Start/Stop
- Locate to /app/oracle/user_projects/domains/base_domain/bin
- ./startWebLogic.sh (Start)
- ./stopWebLogic.sh (Stop)
2. OIM Managed server Start/Stop
- Locate to /app/oracle/user_projects/domains/base_domain/bin
- ./startManagedWebLogic.sh oim_server1 (Start)
- ./stopManagedWebLogic.sh oim_server1 (Stop)
3. SOA Managed server Start/Stop
- Locate to /app/oracle/user_projects/domains/base_domain/bin
- ./startManagedWebLogic.sh soa_server1 (Start)
- ./stopManagedWebLogic.sh soa_server1 (Stop)
Thank you.
Arihant Baid


