Monday, May 18, 2015

OIM 11G R2 PS3 Lab 6: How to Enable Certification, Role lifecycle management and Segregation of Duties (SOD 11g PS3 (11.1.2.3.0)

Steps

1) Login to Oracle Identity System Administration.


2) In the left pane, under System Configuration, click Configuration Properties.


Enable role lifecycle management, Segregation of Duties (SoD), and identity certification. To do so:


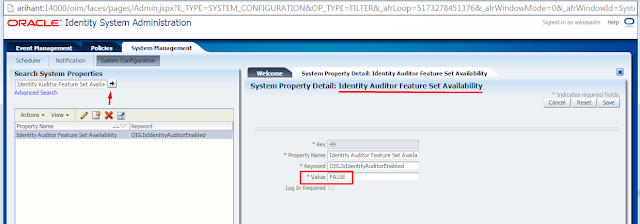
  •  Search for the Identity Auditor Feature Set Availability system property with keyword OIG.IsIdentityAuditorEnabled.


  • The default value of this property is FALSE, which means that role lifecycle management, Segregation of Duties (SoD), and identity certification are disabled by default.


  • Modify the value of the property to TRUE.


3) Click Save.

4) You must restart Oracle Identity Manager (OIM) after modifying the value in system Properties

5) After OIM restart, login to Identity console and check the certification tabs.

* Compliance tab is add in Identity Console
* Certification Section added
* Pending Violations added


* Click on Compliance Tab

* Identity Certification addedd
* BI Reports added
* Identity Audit addedd


* Dashboard ,Certification Configuration,Event are moved from sysadmin console to Identity console.


 Regards,
Arihant


Sunday, May 17, 2015

OIM 11G R2 PS3 Lab 5: Self Registration in 11g PS3 (11.1.2.3.0)

Steps

In the Oracle Identity Self Service login page, click New User Registration. The User Registration page is displayed.


* In the Basic Information section, enter first name, middle name, last name, email, common name, and display name in the respective fields.Display name is the name of the user displayed in the UI. If not specified, then it is auto generated while creating the user.

In the Enter User ID and Password section, enter the user login name, password, and confirm password in the respective fields

In the Select your challenge questions and answers section, select the challenge question and set an answer for each question.

Click Register. In the confirmation message, you are provided with a tracking Registration Request Number that you can use to track the status of your registration process.


* Tracking Request Number auto created. Click on Finish.


*  In the Identity Self Service login page, click Track My Registration. The Track Requests page is displayed.


*  In the Tracking ID field, enter the tracking Registration Request Number that has been assigned to your registration request. Then click Submit.


*  The registration request status is displayed with the following details:

Tracking ID

This is the request number to be entered to track registration status.

Date

This is the last request update date. When the request is submitted and approval is not done, the date shown is the request submission date. In all cases, the date always reflects the last update date.

Current status of the request

Every self-registration request that is submitted has to go through approvals for it to be processed completely.

If a user tracks the current status of the request, the status is shown with a description of the stage the request is in. The status would be one of the following:

Pending: This state indicates that the request is submitted and the approval is pending. In case of default approval, the following status message is displayed:

"Obtaining request-level approval for registration."

If the request level approval is pending. Once the request level approval is obtained, the following status message is displayed:

"Obtaining operation-level approval for registration."

Rejected: This state indicates that the request is rejected during approval. The description indicates the reason of rejection. In case of default approval levels, if the request got disapproved at the request approval level, then the following status message is displayed:

"Request rejected. Please call Help-Desk."

If the request gets disapproved at the operation level or request level, then the following status message is displayed:

"Operation approval rejected for registration."

Completed: This state indicates that the request is completed. If all the approvals have been provided and the request is successfully completed, the following status message is displayed:

"Request has been completed."

Failed: This state indicates that the request is failed during submission. If the request submission is failed, the following status message is displayed:

"The request registration failed."

* Login to Identity console with admin user


* Pending Approvals notify with no of request pending. Click on Pending Approvals


* Select the Pending Request


* Click on Action and select Approve


* Open Identity console and click on Track Requests


*  Request status is completed


* Login as admin user and check newly self registered user.


* Login with Self Registered user


Regards,
Arihant

Saturday, May 16, 2015

OIM 11G R2 PS3 Lab 4: How to Create Disconnected Resource in 11g PS3 (11.1.2.3.0) and Provisioned

High Level Steps

1) Create a sandbox in Sysadmin console from dummy resource and published sandbox
2) Update Task Object Status mapping
3)  Create user, request dummy resource and check the account status

Start

1) Create a sandbox in Sysadmin console from dummy resource and published sandbox

* Login to sysadmin console and click on sandbox


*  Click on Create sandbox


* Give Sandbox name and click on Save and close


* Click on Application Instance


* Click on Create


* Give Name and select Disconnected Check Box and click on Save


* Go back to Sanbox >> select active sandbox >> Click on publish Sandbox


2) Update Task Object Status mapping

* Login to Design console >> Process Definition >> select Create dummy resource


* Click on ManualProvisioningStart


* Click on Yes


* Go to Task to object Status Mapping >> select C status >> Click on Object class of C


* Double click on Object class >> From Pop up select Provisioned status >> Save


 * Click on Save


* Click on Save


3)  Create user, request dummy resource and check the account status

* Login to Identity Console >> Manage Tab >> Click on Create


* Fill user form details and save the form


* Click on account Tab >> Request Accounts


* Select Mobile Resource >> Add to Cart


* Click on Add Selected to Cart


* Click on Next


*  Give username >> Update >> Submit


* Refresh on accounts tab and check the account, Mobile account should be provisioned


Regards,
Arihant Baid

OIM 11G R2 PS3 Lab 3: Oracle Unified Directory (OUD) 11g PS3 (11.1.2.3.0) Connector Installation, Provisioning and Reconciliation

High Level Steps

1) Install the OUD connector in OIM
2) Configure IT Resource
3) Create Form Designer
4) Create Application Instance
5) Run Catalog Synchronization Job
6) Run LDAP Connector OU Lookup Reconciliation
7) Create a user and Provisioned to OUD

Start

1) Install the OUD connector in OIM

* Copy OID connecter  from (OID/OUD/ODSEE all are in OID connector) Connector folder to ConnectorDefaultDirectory folder


* Login to sysadmin console


*  Click on Manage Connector


*  Click on Install


* Select ODESS/OUD/LDAP3 connector and click on Continue


* Click on Continue


*  Check the Installation Status : Successful and click on Exit


2) Configure IT Resource

* Click on IT Resource


* Search IT Resource Type as LDAP >> DSEE Server >> Edit


* Provide the below IT Resource Parameters

   Configuration Lookup=Lookup.LDAP.OUD.Configuration
   baseContexts=dc=oud,dc=com
   credentials=*********
    host=192.168.1.124
    port=389
   principal=cn=Directory Manager
   ssl=no


3) Create Form Designer

* Click on Sandbox


* Click on Create  Sandbox


* Give Sandbox name


* Click on Form Designer


* Click on Create


*  Select Resource as LDAP, Give Form Type name and click on Create


4) Create Application Instance

* Click on Application Instance


* Give Name, Select Resource Object, IT Resource, Select Form and click on Save


 * Select sandbox and click on Publish Sandbox


* Click on Yes


5) Run Catalog Synchronization Job

* Click on Scheduler


*
* Search for Catalog Synchronization Job and click on Run Now


6) Run LDAP Connector OU Lookup Reconciliation

 Note - Crate some OU's in OUD LDAP before you run OU Lookup Scheduler.

* Search for LDAP Connector OU Lookup Reconciliation job and click on Run Now


* Login to design console and check the Code and Decode value in Lookup.LDAP.Organization lookup. After running the above job it should bring the  organizationalUnit from LDAP.


7) Create a user and Provisioned to OUD

* Login to Identity console and click on Users from Manage Tab


* Click on Create


* Fill the user from details and click on Save


* Click on Request Accounts from Users Account tab


* Select OUD App >> Add Selected to Cart >> Next


* Check the Grant will be effective immediately upon request completion and update


* Select the Container DN from the lookup and click on update


* Click on Submit


* Refresh the User's Account tab and check the account status it should be Provisioned 


* Check the User in OUD LDAP


Regards,
Arihant Baid